Sunday, January 05, 2014

Withdrawal

One year ago this month, in my eighth anniversary post I vowed to blog more, but instead I blogged less. In fact, I haven't posted at all for several months.  What was apparently procrastination has become a deliberate decision to stop blogging, if not forever, then at least for quite a bit longer. So this ninth anniversary post is a formal farewell.

On one hand, putting the blog to sleep relates to my withdrawal from Facebook (to which I had become quite addicted) as well as most other social media sites.  I currently don't feel inclined to share photos or descriptions of my activities on the Orwellian version of the internet that was revealed to us in 2013. Not because I have anything to hide from the governments, but because I don't feel inclined to contribute more than I have to the Big Data that corporations are increasingly using to undermine the environment, human rights and democracy.  Yes, of course my banking, podcast listening, video watching, library borrowing, musical preferences, TimeBank activities, yoga practices, petition signing, online purchases, Google searches and dozens of other activities are feeding into Big Data, but I don't have to share my thoughts and emotions regularly as well.

For the past few years almost no one read this blog who didn't also follow me (and thus links to new posts) on Facebook. Thus it's entirely possible that no one will read this (unlinked to social media) final post. If you are reading: Hi! Thanks for stopping by.

What's filling the gap in my life left by blogging and social media?  Chickens and gardening for food, preserving my harvests,  face to face time with local friends and writing letters on paper to friends and family who are far away.  My creative energies are more focused on solving practical problems like designing and building a chicken coop. I'm committed to developing my nascent carpentry skills, and perhaps this might be another way my art may express in the future.

Right now, my art practice is low key and unexpectedly papery and collaborative. Frugal with the Bruegel, my altered book collaboration with Bethwyn Littler, seems to be taking a new and exciting direction this year: not just books anymore!  And I have added my Adana press and cabinet of lead type to the workshop at Black Fox Press and am excited about working alongside friends typesetting and printing text again.

So that's it, after nine years of Bibliophilia, I'm putting the blog to bed for the foreseeable future. The archives will stay online of course, but there won't be any new posts. So Happy New Year, and Goodnight! xxMeliors

Snoozing chicks at 2 months. They really have that green and mauve disco sheen to their feathers.


Wednesday, October 09, 2013

Spoils at draw.inc

Stuart Shepherd's ice penguin (foreground) and Dispersant (background)
There is still at least a week left to see my work in the Spoils exhibition at draw.inc in Hamilton. My two large textile installations share the gallery spaces with Stuart Shepherd's sculptures, conducting a lively conversation about oil and mining, asset sales and climate change.


Dispersant
Dispersant has been hung for this Hamilton audience, looking just as lovely though quite different than in a tight space against a blue background as it was installed in 2012.

Dispersant detail

Looking through Dispersant to Alexandra Street and Creative Waikato opposite
 Occasional flashes of sunshine through the window and a breeze from the door add movement and shadows unique to this space.  Those moments are quite magical, all the more for their rarity.

Catching shadows and a breeze
The show is in two galleries, facing off on opposite sides of the street.  So, across the road from Dispersant, I've installed Memorial (Pike River) which almost perfectly matches the grey carpet in that gallery.  It is the first time I've ever been able to spread the 29 pieces out in a suitable space and finally realise my original vision. I played around with different ways of arranging the stitched blanket mounds and eventually settled on the little groupings randomly spaced because it reminded me of the family, friendship and workmate relationships between the men who died two years ago, and still lie underground.

Memorial (Pike River)
 Also in this much larger space Stuart has installed paintings, prints and sculptures.

Stuart and Philippa installing his wallpaper, printed off a carved wooden table which forms part of his installation.
Our opening last Thursday was good fun. I made all our food myself, and everyone said we had the best nibbles of the three openings that evening on Alexandra Street.


 After we packed up, I put the posies I'd made from my garden for the food table down into the installation, as flowers seemed appropriate for a Memorial.

Memorial with flowers from the opening

Monday, June 10, 2013

Creating Pathways

A new little pathway (with Jaq the three legged chihauhau back by the worm farm)
I  continue to be preoccupied in the garden, making new raised beds for planting, and putting in access paths. Both tasks are hard physical labour that leaves me exhausted if I go at it for more than a couple of hours at a time. But the results are very pleasing, so I'm trying to learn to pace myself better when carrying concrete slabs or digging.

I'm also trying to avoid unnecessary expenses in the garden so both my raised beds and paths are made with things I've found for free or very cheap: odd paving stones, old bricks, broken concrete, a material that usually ends up in landfill but when reused  is sometimes called 'urbanite'.  There was a lot of broken concrete lying around the property when I arrived but I've used it all up and now have to go out and collect it from other people's places- more heavy lifting.

My two most recent path projects are short and sweet.  Inside our front gate is a dark damp little wedge which I'm trying to make lighter and more attractive.  This is what it looked like a year ago, just before I moved in:
That nasty spiky plant positioned to poke everyone in the eye as they entered was the first to go.  
Weeded, with a few pavers and bricks arranged at the bottom of the steps
Cleared for action, with a bunch of tiny baby succulents newly planted and almost invisible on the right. 
I cleared away all the weeds, moved the pebbles around a bit, and planted up succulents against the house. Access to the front door is up the steps but to get around to the back garden and the cottage where my flatmate lives involved crunching over more pebbles- particularly troublesome for pushing a bicycle or wheelbarrow, but it stayed like that for nearly a year. I kept waiting for someone who might help me make a proper path.
looking down on the new path from the deck
Then last month I finally just went ahead and made a new little side path, using only materials I already had and laying them onto bare earth. I've researched enough about making paths to know I haven't done it properly, but it looks all right and so far it hasn't tripped anybody up.  I still need to rearrange the pebbles some more, and once the planting takes off come Spring it should be a much more welcoming entrance area.  Even at this stage of work in progress I still get a little thrill every time I come home and open the gate.
An improved entrance- look how well my succulent garden is coming along.
The other recent path project was to fill in a soggy gap between the wooden boardwalk and the steps to Shirley's cottage behind the house.  A few overgrown bits of broken concrete dotted a low lying lawn which collected rainwater, making winter access very muddy.  Having gained some path making confidence with the entrance above, Autumn's rains prompted me to finally have a crack at the cottage pathway.

The old path, last Spring
I decided to try and make the path flush between the top of the boardwalk and the bottom-most step, which meant raising the path quite high up from the lawn. I bought a $17 of pit sand for the purpose- the only cash spent on both paths.
A Summer view showing the boardwalk which comes to an abrupt end halfway to the cottage.
 I dug out the grass first and then put in little trenches on each side of the path to try and help with drainage.  Shirley and I put in wooden boards on each side and then filled the trenches and centre with sand, trying to make it as compressed and level as we could without specialised tools.

More-or-less finished path, raised up from the lawn to be level with the boardwalk and bottom step.
We made the path on a Saturday morning, trying to beat rain forecast for late morning so I had started very early preparing the foundations. Just as I'd laid the first few pavers, friends arrived with a truck load of free firewood which I had to help unload, and by the time I'd done that I could hardly move. Luckily Shirley did a great job to finish laying the path, so it was truly a collaborative effort.

High and dry crazy paving. The feet came with the cottage.

Thursday, May 16, 2013

Huhu Grubs and the Hugelkulture Influence

Wood on newspaper

I've been given a lot of rotten wood to use in my garden, as a layer in the raised beds I'm developing in the front yard. First I put down a layer of carpet or cardboard or newspaper to suppress the weeds, then I pile up rotten wood, then  dollop on home made compost followed by a layer of soil on top to plant seeds and seedling directly into, then finally mulch. I'm inspired by a permaculture technique called Hugelkulture which combines carbon sequestration with soil enrichment. It's a big project and I'm progressing slowly but steadily.

A huhu grub pokes it head out of its hole, perhaps surprised to breath fresh air?

The advantage of building up a raised bed with rotten wood is two-fold.  The wood will act as a sponge, soaking up rain during the wet winters and releasing it slowing into the soil as it dries out over summer. I shouldn't need to water these beds much, if at all, the next time there's a drought like the one we've just come out of.  Rotten wood doesn't just release moisture though, its chock full of microorganisms busy converting wood into compost which makes for a rich  fertile growing medium. I expect these beds to grow abundant, healthy, productive plants.

Another huhu grub reaches across the newly divided log, looking for its fellow grubs?

Some of the organisms doing this important work are not so micro.  Inside one log, a family of huhu grubs, each the size of my little finger, had turned the wood to mush. They seemed quite startled to have there mushy home split in half by my axe.  After photo time, I pushed the halves of the log back together to let them get back to their carbon sequestering activities.


A third huhu grub landed on the ground letting me have a good look at its pallid, plump, caterpillar-like body. 

On meeting my huhu grubs, I did consider the United Nations' recent recommendation to eat more insects as a valuable and sustainable source of protein.  But... I feel I'm pretty well supplied with more palatable sources of protein just at the moment. Frankly, the wood-composting contribution of the grubs to my future diet of home grown fruit and vegetables seems more valuable than a mouthful of "buttery chicken" flavoured larvae (according to wikipedia).

Huhu in motion

My first hugelkulture bed, half finished.  

I just  reread the hugelkulture article, and remembered there's a lot more advantages to rotten wood in your raised beds than I mentioned above.  They  are 

"loaded with organic material, nutrients, air pockets for the roots of what you plant, etc. As the years pass, the deep soil of your raised garden bed becomes incredibly rich and loaded with soil life. As the wood shrinks, it makes more tiny air pockets - so your hugelkultur becomes sort of self tilling. The first few years, the composting process will slightly warm your soil giving you a slightly longer growing season. The woody matter helps to keep nutrient excess from passing into the ground water - and then refeeding that to your garden plants later."


Wednesday, May 01, 2013

Incidental harvest


 Going outside to tidy up summer vegetable beds and prepare for winter crops resulted in a basket full of goodies.  The last of the tomatoes, a second crop of potatoes, some forgotton carrots, radishes and beets joined the usual haul of parsley and feijoa.

On another sunny autumn morning I dug up my first experimental kumara (sweet potato). Not an enormous yeild, but several meals worth for me, and I love purple skinned kumara the best.


Thursday, April 18, 2013

Falling for the Hobbiton Aesthetic

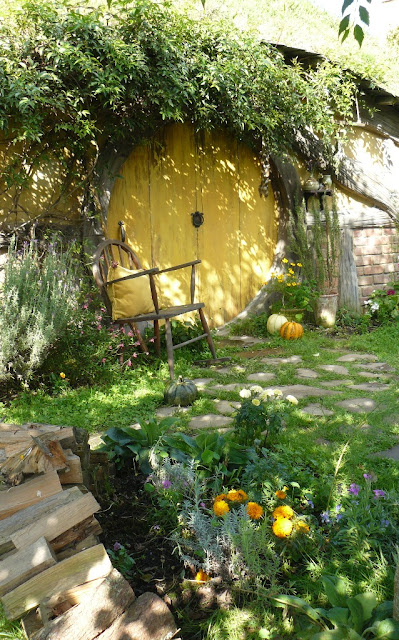
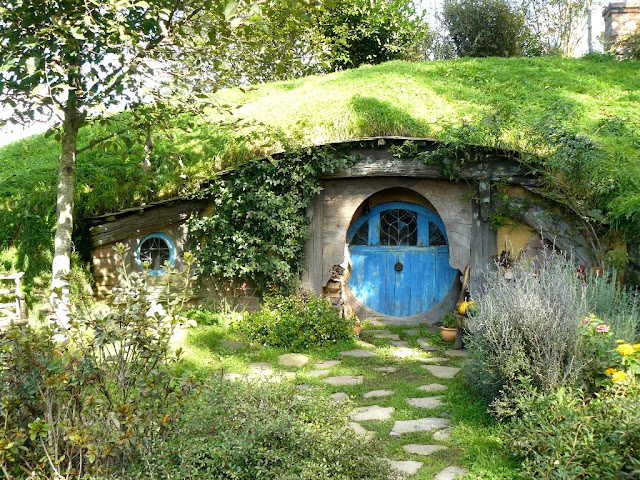
Bag end, home of Bilbo and Frodo (with nasturtium and comfrey)
It may be unpatriotic to admit this, but I am not a fan of the Lord of the Rings, or Hobbit, films. I enjoyed reading the Hobbit as a child but found Tolkien's LoTR to be a slog. I have watched all the films, to see what the fuss is about, but had trouble staying awake through them. My favourite bits were always in the Hobbit home village.

Child size chair and a stack of firewood
I do feel a connection with the stay-at-home hobbits that Frodo and Bilbo left behind, with their cosy underground houses, well-stocked pantries and second breakfasts.  So when my cousin from America, who is a serious LoTR film fan, came to Hamilton last week I was happy to have an excuse to visit the nearby film set of Hobbiton, now a Waikato tourist attraction.

Community garden with birdhouse

I was quite charmed by Hobbiton, not so much by the round doors, but by the consistent attention to quaint detail. It feels like a cross between an historical village and a permaculture farm, all scaled down to child size.  Hobbit extras were required to be 5 foot tall, just my height, so being on their the film set was a rare experience of not feeling too short for the world. Even the furniture and tools were to my scale, with practical little ladders scattered everywhere. It was also a welcome oasis of lush green abundance after a long drought.


Little ladders come in handy for hobbit-sized folk

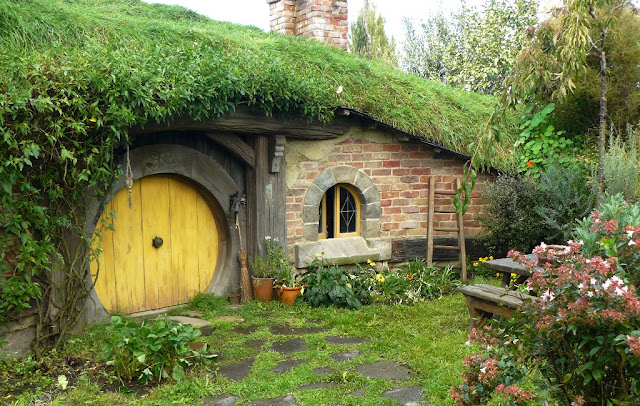
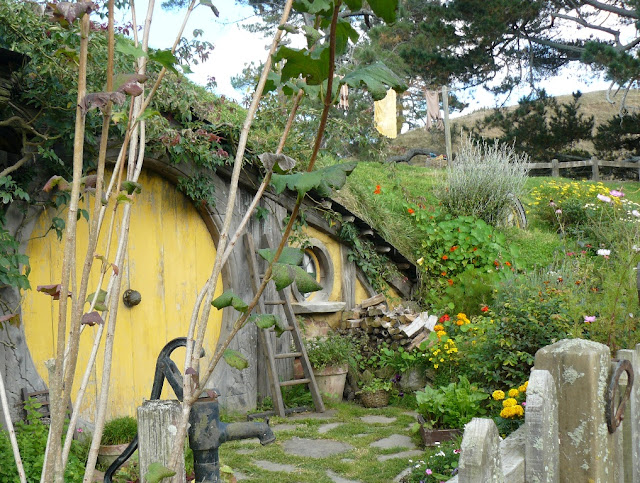
There are no obvious anachronisms once the bus drops you off at the entrance to Hobbiton. In this version of Tolkien's pre-industrial arcadia everything  is made by hand of natural materials (or appears to be); from the thatched roofs,  fancy iron work, carved wooden facades, lead-light windows to the lush green turf and pretty pumpkins piled around.


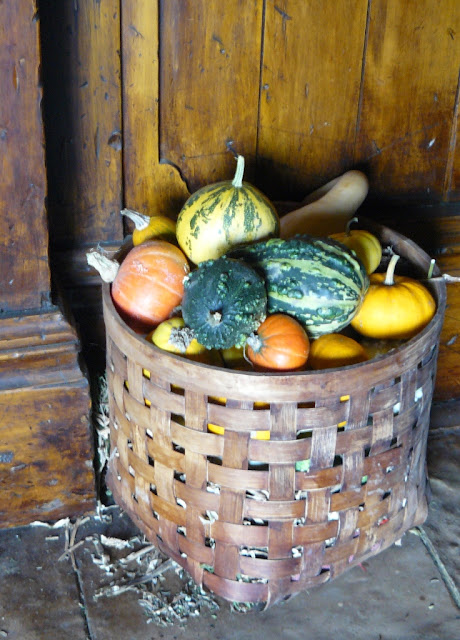
Punpkins in the Green Dragon 

Hobbit hole facade with doorstep cottage garden 
The original temporary film set has been rebuilt in permanent materials for the popular tourist attraction, now more than 10 years old and entertaining thousands of people every day (70 people every 15-30 minutes all day long every day of the year).  It is all make believe, from the empty spaces behind every hobbit hole facade to the painted lichen on the picket fences. Among all the genuine trees in the village there is one (on top of Bag End) which was built from scratch for the first film, at a cost of one million dollars.

Million dollar fake tree on top of the hill, real trees in the foreground:  pear grafted onto quince  and apple both laden with unpicked fruit
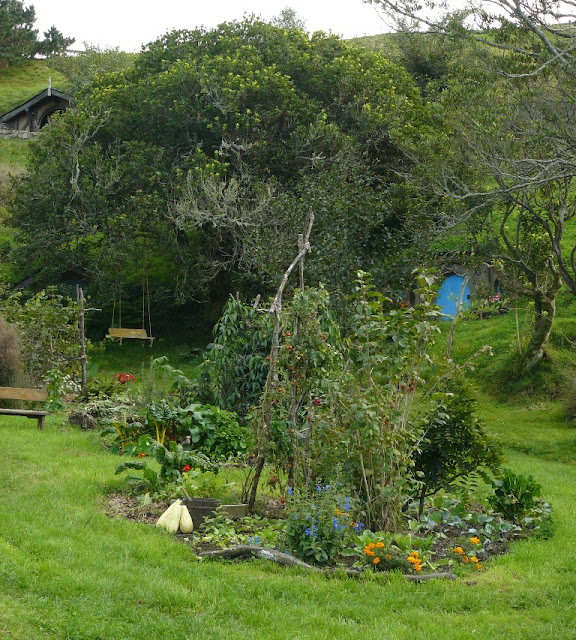
I was especially delighted and inspired by the gardens which (the guide advised) are kept looking in just this state of tidy fecundity year round by a team of 30 gardeners, who must finish their work before the first visitors arrive at 9am every morning.  The gardens in front of the hobbit holes are refreshed with flats, troughs and pots of plants, changed out regularly for year round blooms. Yet this seems entirely appropriate, for the containers are all weathered wood or faded pottery so they look like what Hobbits would use.


These tiny cottage gardens (which could be replicated in a tiny balcony or courtyard) are complemented by larger community gardens which really reminded me of favourite permaculture gardens I have known. They look like a pretty jumble of plants in polycultures, with great a diversity of not only edible but beneficial insect attracting flowers. These larger gardens are not renewed with pots and flats, but I could see succession planting evident everywhere.  Patches of plants abutted in various stages of growth from seedlings to ready to harvest.


The lush green abundance of the whole set is maintained by more irrigation than anyone in town has been using during this recent drought.  It was a welcome rest for eyes seared by my sad dry garden at home. I was also glad my cousins got to see the unique lurid green grass of home that is more usual for the Waikato.


Hobbit swing
Fake as it all is, I still got inspiration, or at least aesthetic affirmation, for my own garden design aspirations: all curves, no hard straight smooth lines or surfaces.  Lots of edges, lots of bee friendly planting.  Flowers, herbs, vegetables and fruit all together filling every niche.

bee and butterfly sharing pollen

Mill with row boat and fishing rod

We got an hour or so to wander through Hobbiton, either at our own pace or following Aiden, our well informed guide. The tour finished at the Green Dragon pub, across a charming stone arch bridge next to the thatched and half timbered mill with working water wheel.  There we supped a free cider served in beautiful hand thrown pottery mugs. Sitting by the (real) fire, we looked out across the mill pond, back to Hobbiton.

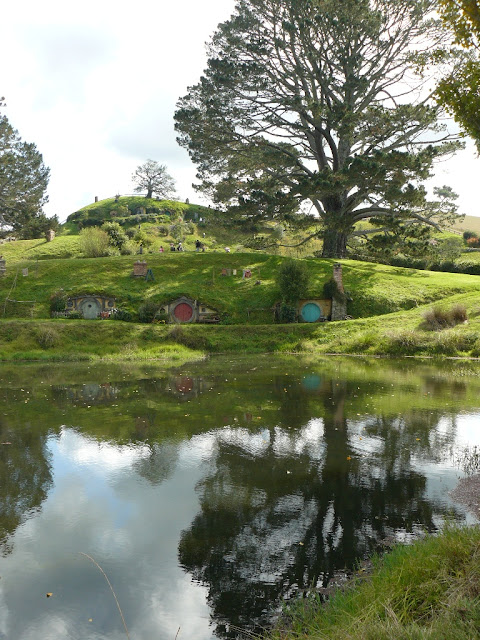
Hobbiton across the mill pond
The Hobbiton experience is expensive ($70 adult, $10 child) but I think its good value, even for a non-fan like me. I was utterly charmed and delighted at every turn. After an hour and a half I didn't want to leave.  My Lord of the Rings-fan cousin was satisfied on even more levels.

Charmed


Sunday, March 24, 2013

Another snowy story


This time I'm stitching in the Arctic, thinking about the melting Greenland Ice Sheet.  It's shades of cream and white- what ever odd balls of wool I can get a hold of: every one a different texture and weight. Mostly I think of what I am making as ridges of stragusi (wind hardened snow) but sometimes they seem more like ice floes floating on the warming water.


I want to make a big afghan to cover my new big bed, in my Polar themed bedroom.  I started out thinking of granny squares, but not so colourful since the room is entirely blue and white, but monochromatic granny squares seem much less charming.  After too many hours of trial and error, I finally came up with this project of irregular strips because I had enough white/cream wool to start it off. I will probably hook them together with shades of blue to represent the melt.


To tell the truth I needed a portable, modular project which could keep my hands busy while I listened.  I have trouble not fidgeting, and keeping my attention engaged in meetings or classrooms but if I'm doing something simple, like crochet, I can stay present, retain information and think clearly.  It actually works even better for me than taking copious notes.

Now that I'm finished March's intensive two week training, I'm still grateful to have a project that is easy and portable since most of my projects at the moment tie me to my studio and require intense concentration. I've got Jury Service coming up in April, and this crochet will be my way of surviving the tedium of the selection process. Unfortunately I'm pretty sure no judge would allow me to stitch while actually hearing a case, even though it would make me a better juror.


Saturday, March 09, 2013

Watering in a drought

I'm hanging out for some decent rain on  my garden. A couple of days of drizzle to soften up the ground followed by a couple days of steady downpour to soak in deep would be great, thank you.  The official declaration of drought in the Waikato earlier this week was accompanied by a total ban on sprinklers which is fine by me because I have only ever hand-watered my garden.  My watering routine is time consuming, but water-conservative. 

A young lemonade tree that was mostly dead when I rescued it from a neglected pot. Planted with nasturtium and chamomile, dug up twice the the neighbour's dog and yet thriving in this dry.
I try and water all my pots and the raised bed almost every day but most of the vegetable beds are watered only every 2-3 days.  Heavy mulch seems to be keeping everything just moist enough to stay alive on this regime. I stopped watering the flowers  at all  a couple of weeks ago and they are struggling but would be winding down this late in the summer anyway. The beds I planted on top of layers of wood and half-rotted compost seems to be the best at retaining moisture- just as promised in the permaculture resources that inspired me.

The young fruit trees planted six months ago get watered once every 2-3 weeks.  They are also heavily mulched and most of them were planted on some chunks of rotten wood at the base of the hole to act as water sponges for just these kinds of dry conditions.  The trees aren't growing much in this dry, but neither are they dying.

My never-watered (and slightly weedy) succulent garden with pebble mulch and the washing machine water diversion hose running along the wall to reach the fruit trees in the front yard.
So if I don't use a sprinkler or irrigation, where do I get my garden water from? First of all I divert as much household water as I can from going down the drain.  Only when I have run out of diverted grey water do I turn on the hose and hand water the rest of my edible plants.

I start off by showering with a couple of buckets at my feet.  I can get up to half of my pot plants (tomatoes, peppers, strawberries, herbs etc) with my shower water. This water includes a little  diluted  mild vegetable soap and the baking soda and cider vinegar with which I wash my hair, it all seems fine on the garden.

Then I take kitchen rinse water outside to more of the pots. The nutrient-rich rinse water from milk cartons and soaked saucepans also seems to agree with my plants which are continuing to thrive and produce food.

Washing machine water running out on to bark mulch at the base of the young apple tree
On the rare occasion I fill my bathtub (and sometimes this summer a cool bath is what I crave more than anything at the end of a hot sticky day) I do not drain the water but ladle it out in buckets - up to 24  and slosh them onto my fruit trees and the vegetable garden.

The latest, and most sophisticated diversion, is from the washing machine. Rather than try and capture buckets of rinse water being pumped from the machine into the tub (which I have done on occasion-its even more of a hassle than emptying the bath) I now poke the hose out the laundry room cat door to flow into a bin squatting unattractively on my front steps.  A pipe inserted at the base of the bin channels the laundry water out into a hose which I can direct towards each fruit tree in turn. This means a deep soak for each tree every 2-3 weeks.

Washing machine hose diverted to a collection barrel with pipe for directing water into a garden hose.
Despite this years endless dry, I can remember last winter where it rained every day for months on end.  Our all or nothing precipitation will only become more extreme as climate change tips over into post-Arctic-melt chaos. So I am putting my mind to other, more efficient ways to capture winter rains and store them for slow release in summer droughts.  I will be setting up as many Hugelkulture-type beds and rain water collection barrels as I can manage.

Sunday, March 03, 2013

From the top down

Felting the contour edges in bush-green tones.
I've picked up a project again that I started last year and then put aside for other more pressing things.  In the interim I've lost my passionate commitment to the original concept, but the piece is big enough for me to take it quite a bit further before I have to decide exactly what it 'means'.

Felting  needles in action
The 50 metre contour lines are those of Mt Te Aroha, as are the mottled tone greens of the New Zealand bush.  The way I make a mountain (or any landscape) from blankets is to work from the top down, finishing each contour before adding the next one below.

Over-stitching with mixed strands of DMC cotton.
There's a lot of colour mixing to do before I felt and stitch the blankets together.  I blend five shades of dyed wool into combinations of two or three to get the subtlety of many different plants sitting in light and shadow.  The thread is even more work- I separate six stranded DMC cotton into pairs and single strands and them mix six colours into various combinations to stitch as three strands.  After all that finicky preparation I eventually apply the wool and threads more or less at random.

Looking out across the mountain top